Add, edit, and remove users in Padlet for Schools (at padlet.com)
Not currently set up for rostering? Click the name of the rostering system above to learn how to get set up!
Add users
If you are the Owner or an Admin in a Padlet for Schools account at padlet.com, you should have access to the Members page from your dashboard. Click on the Settings cog icon at the top of the dashboard > click your School name (at the top), click Members (on the left).
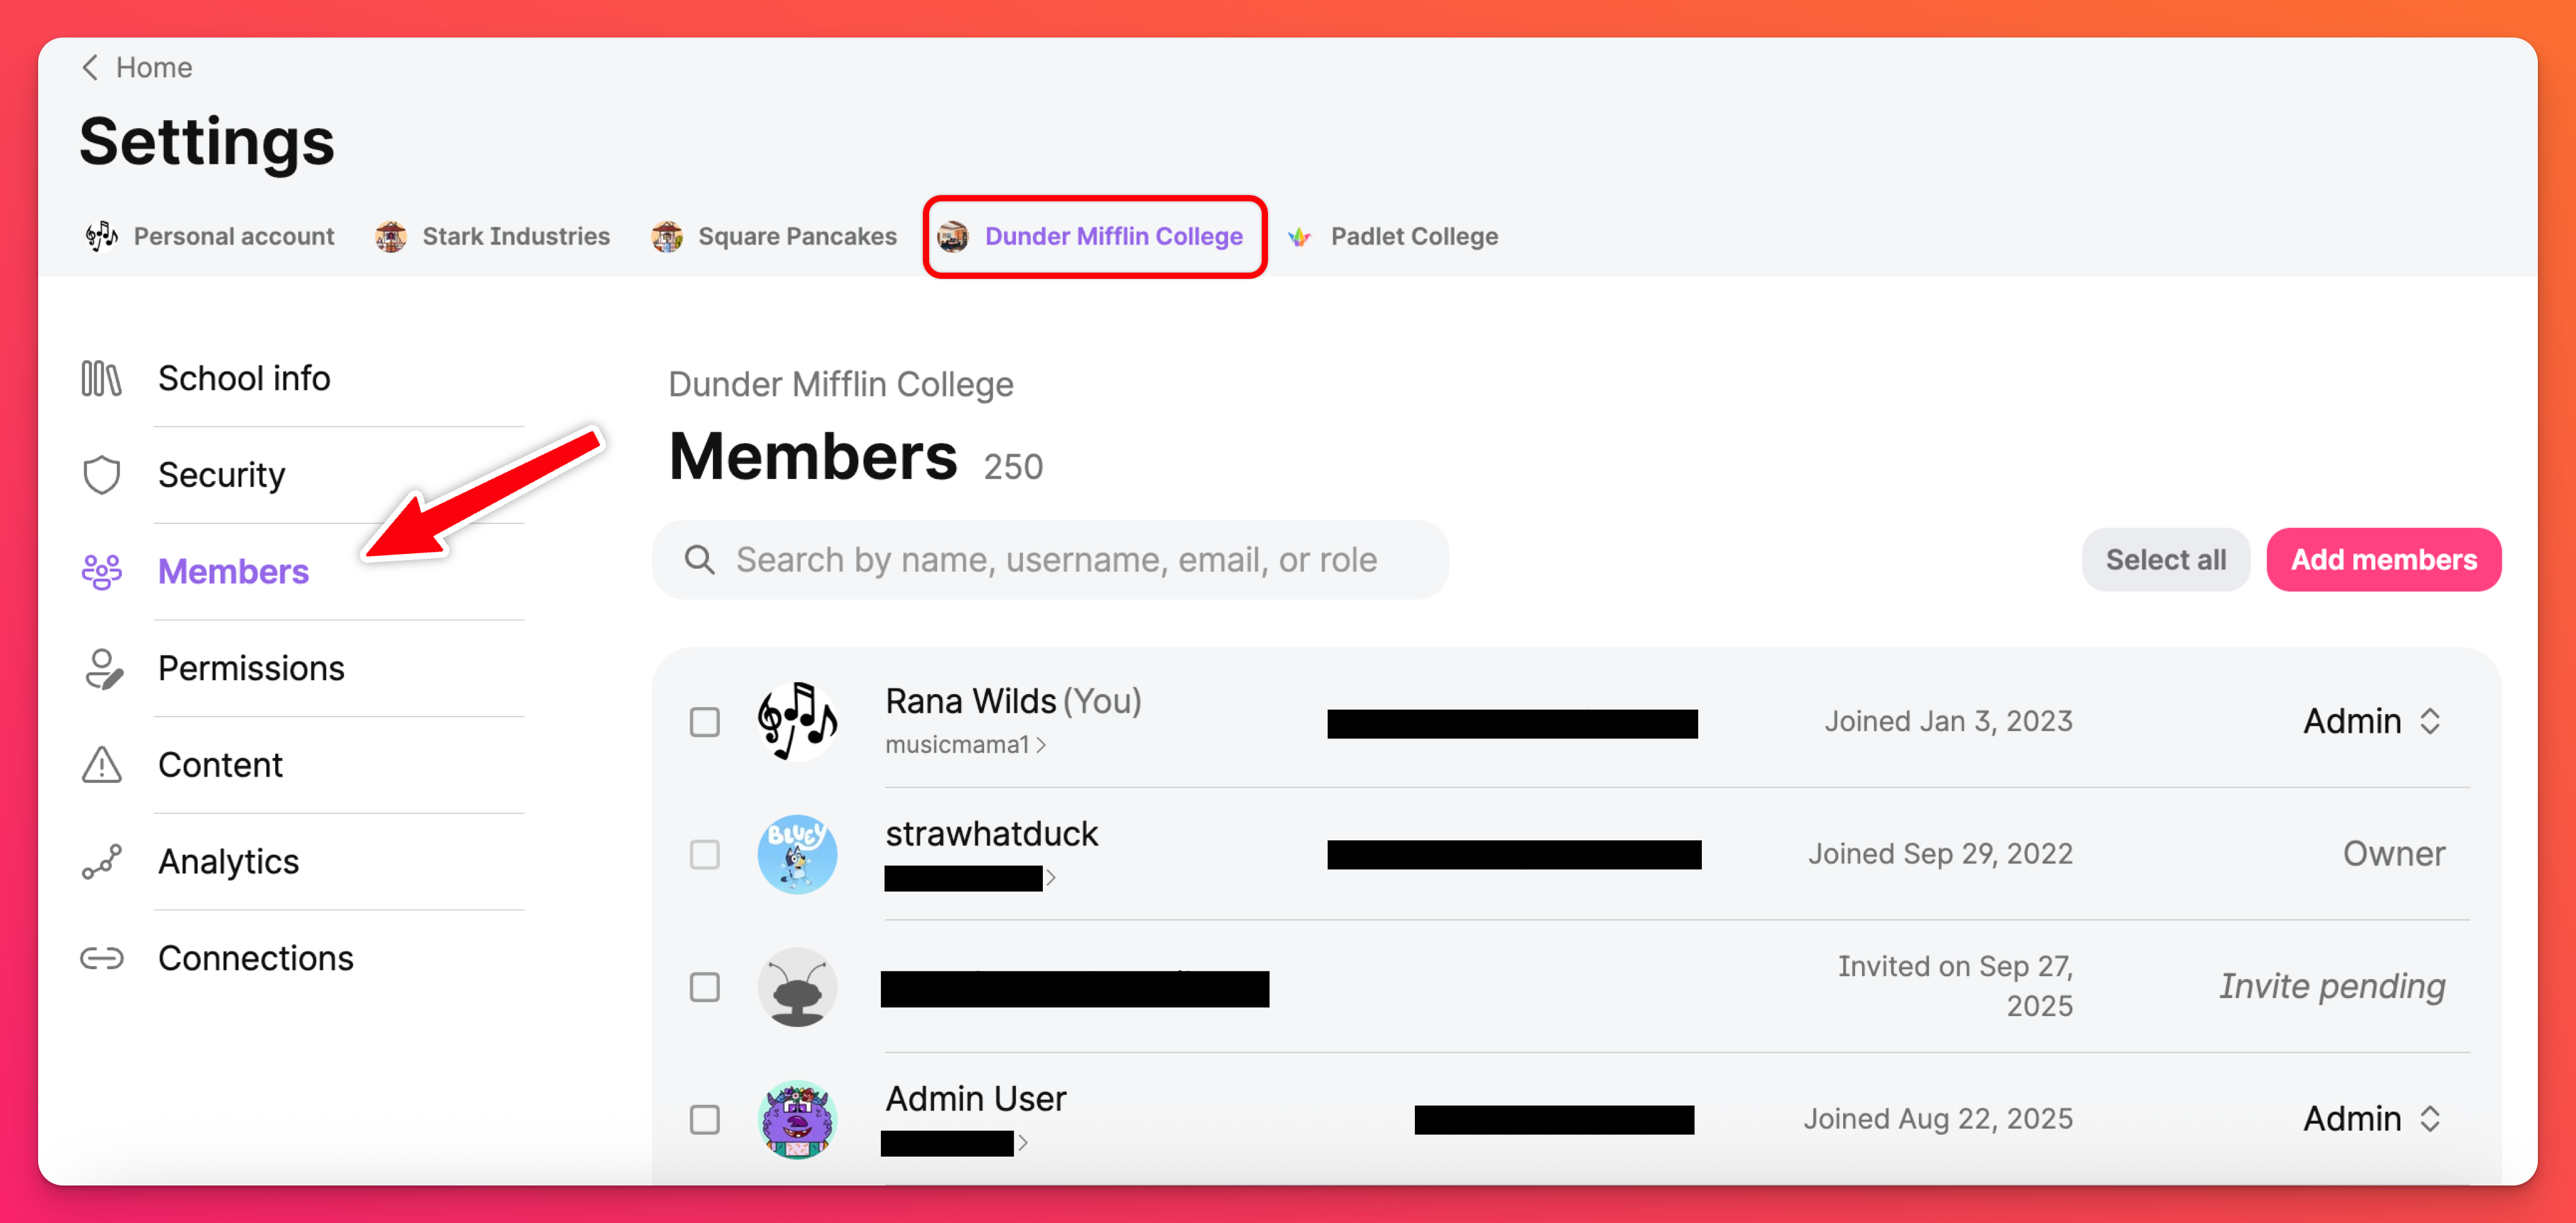
Add users to your account in one of the following ways:
- Share an invite link
- Add individuals manually (via email)
- Upload using a CSV file
- Domain approval
*Owners/Admins: If you do not want teachers to add members, you can adjust this permission within the Settings. Learn more.
Share an invite link
Sending out an invite link is the most convenient way to get people to join your organization. With links, you can add people without assigning usernames and passwords or filling out a spreadsheet. This is especially useful when inviting users in bulk with assigned user roles.
Owners and Admins can share invite links by performing the following steps:
- Click the Settings cog icon at the top of the dashboard > select your School name from the top > Members
- Click Add members
- Select Invite links
- Click Enable link next to the role you want to invite for. Then, click Copy.
- Paste the link into an email (or whichever form of communication you prefer) and share it with those you wish to invite!
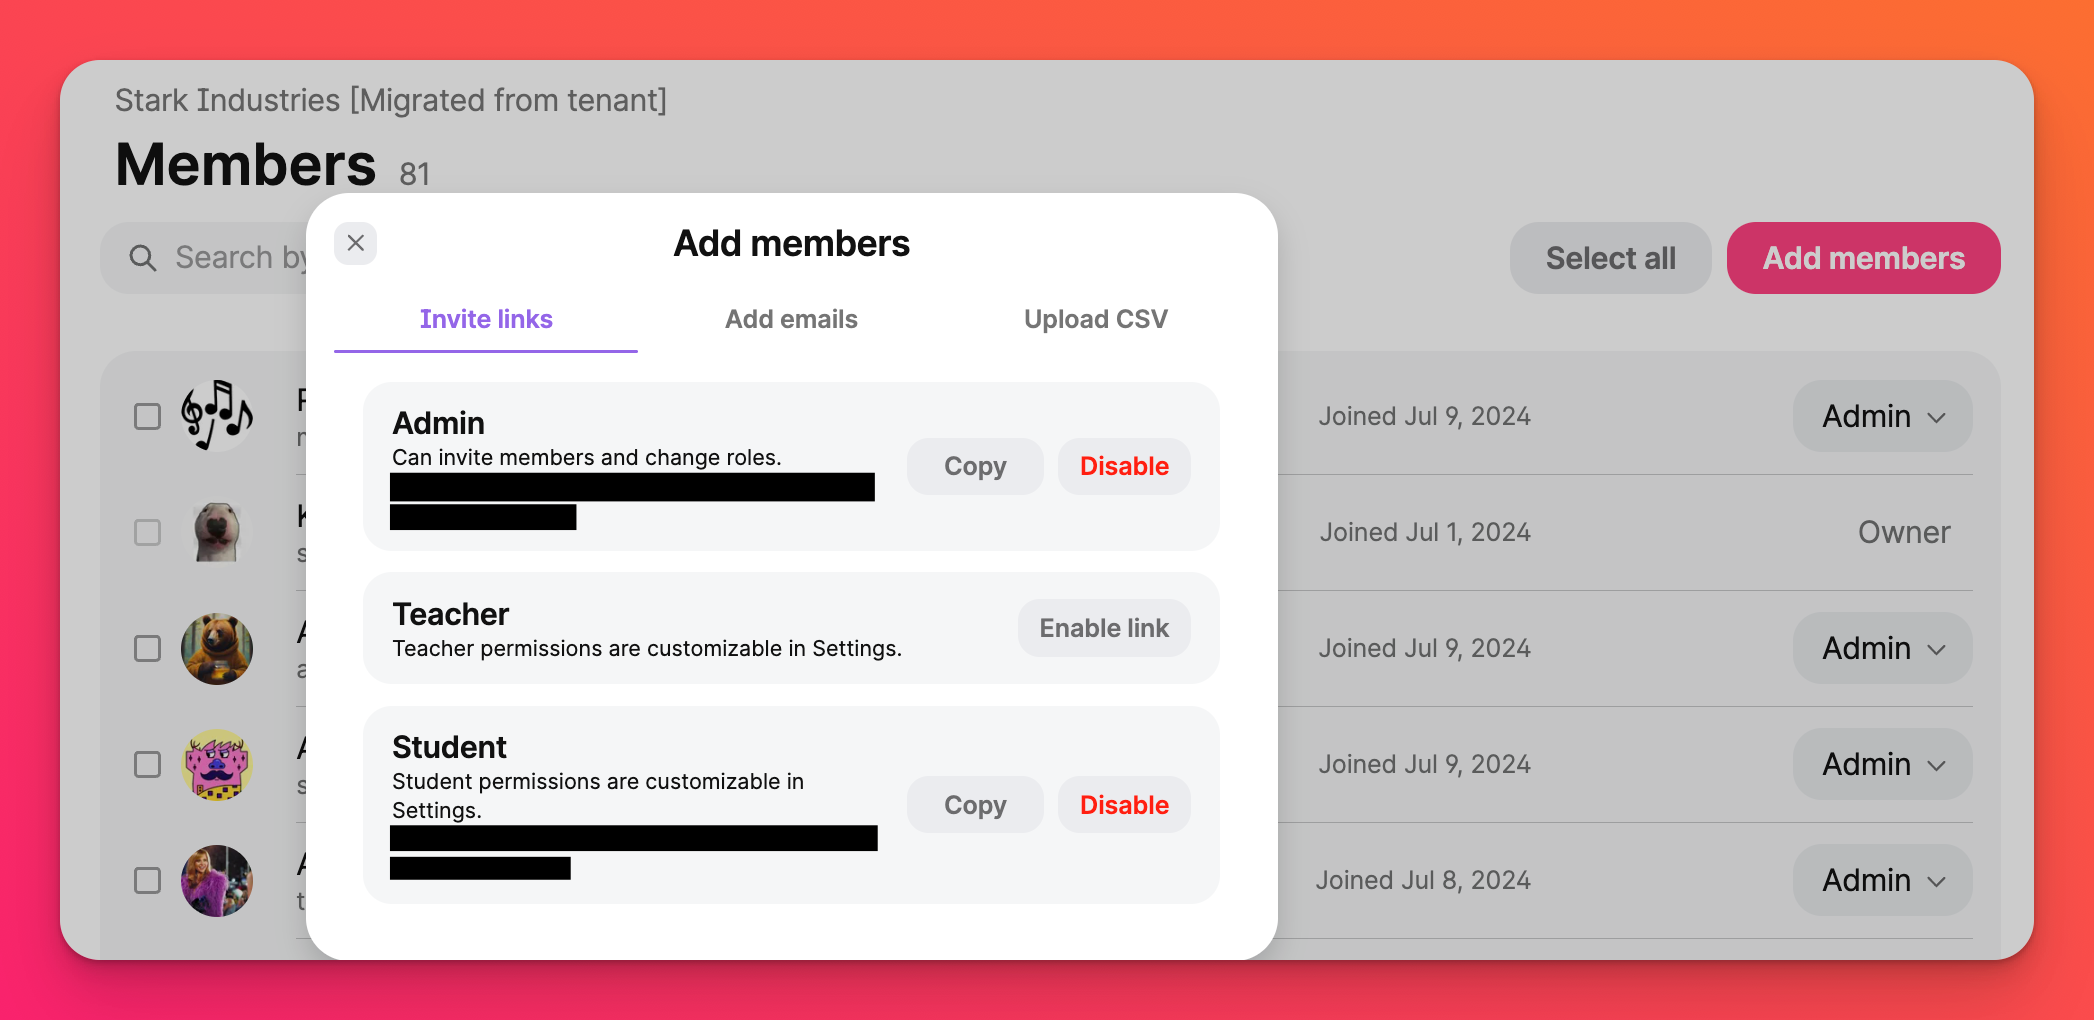
Users without an existing Padlet account will be added to the Padlet for Schools account automatically once they have accepted their invitation. Their user role is assigned based on the invite link that was sent to them.
Invite links do not expire but account owners have the option to disable invite link sharing and reset the URLs to control the registration to the Padlet for Schools account.
*Do note - once a link is disabled it is no longer active. When you click Enable link again, it will be an entirely new link.
Cancel / Resend invites
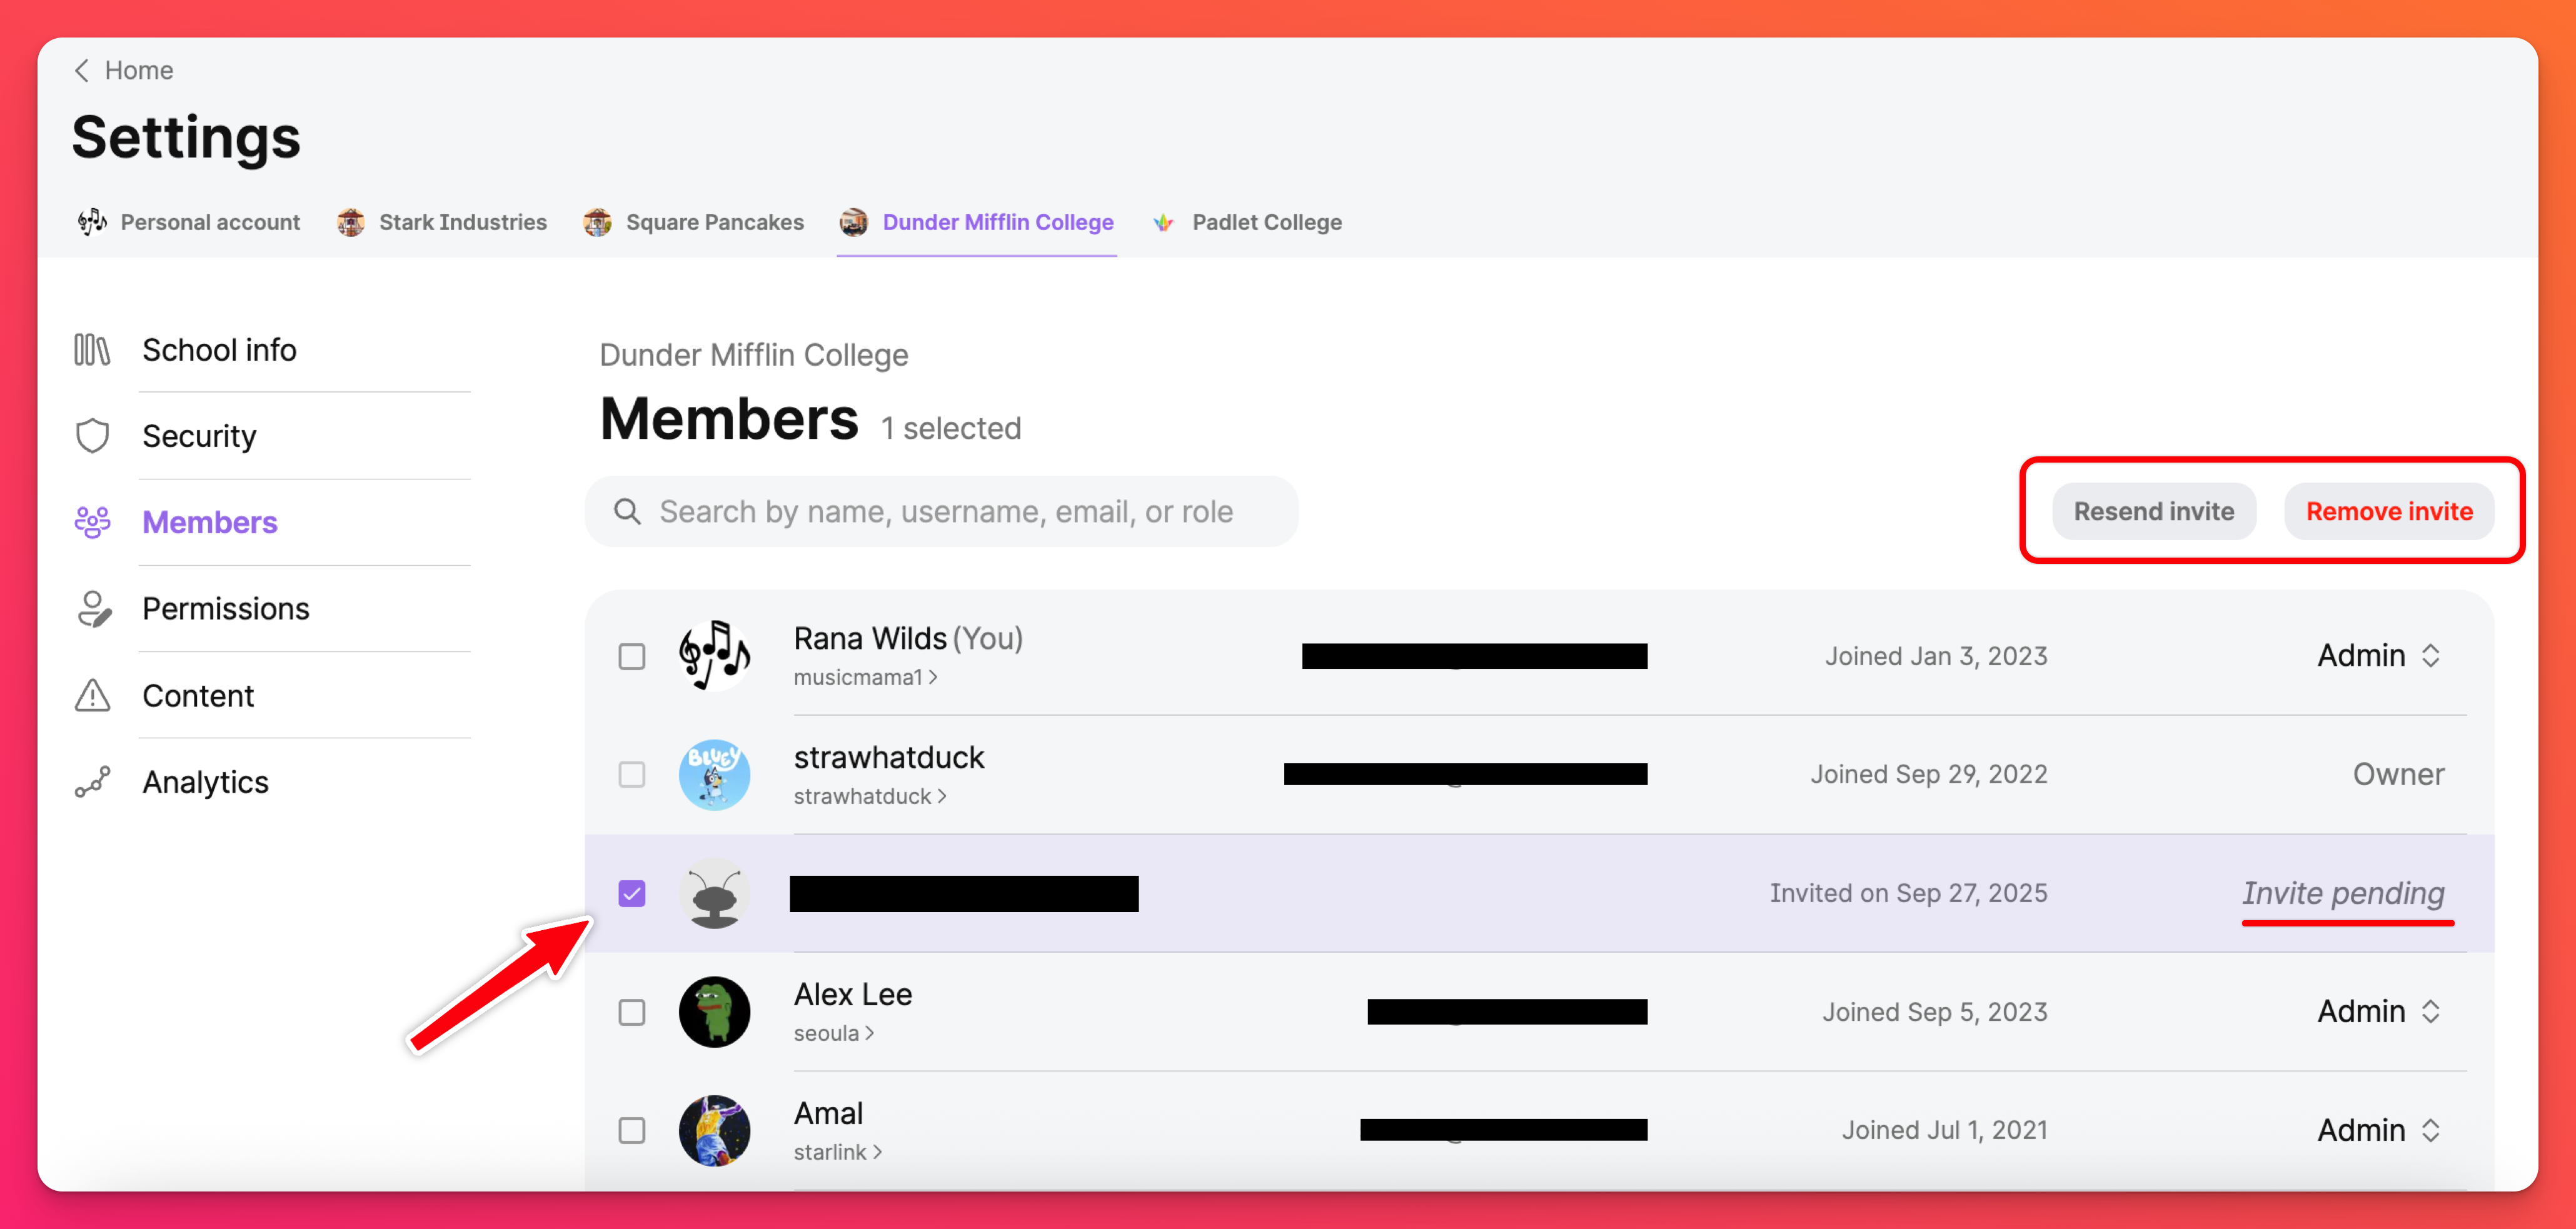
Sometimes invited users need a little nudge to remember to accept their invitation to join your school. Reminder emails are already sent to users that have been invited to the account but have not yet accepted their spot. However, if you'd like to go ahead and resend the invite yourself, you can!
From the Members page, check the box next to the pending invite and click Resend invite (at the top).
Add a single user
- Click the Settings cog icon at the top of the dashboard > select your School name from the top > Members
- Click Add members
- Select Add emails
- Type the email address in the field provided and click the drop-down menu to select what the new user's role will be
- Click the pink, Add button
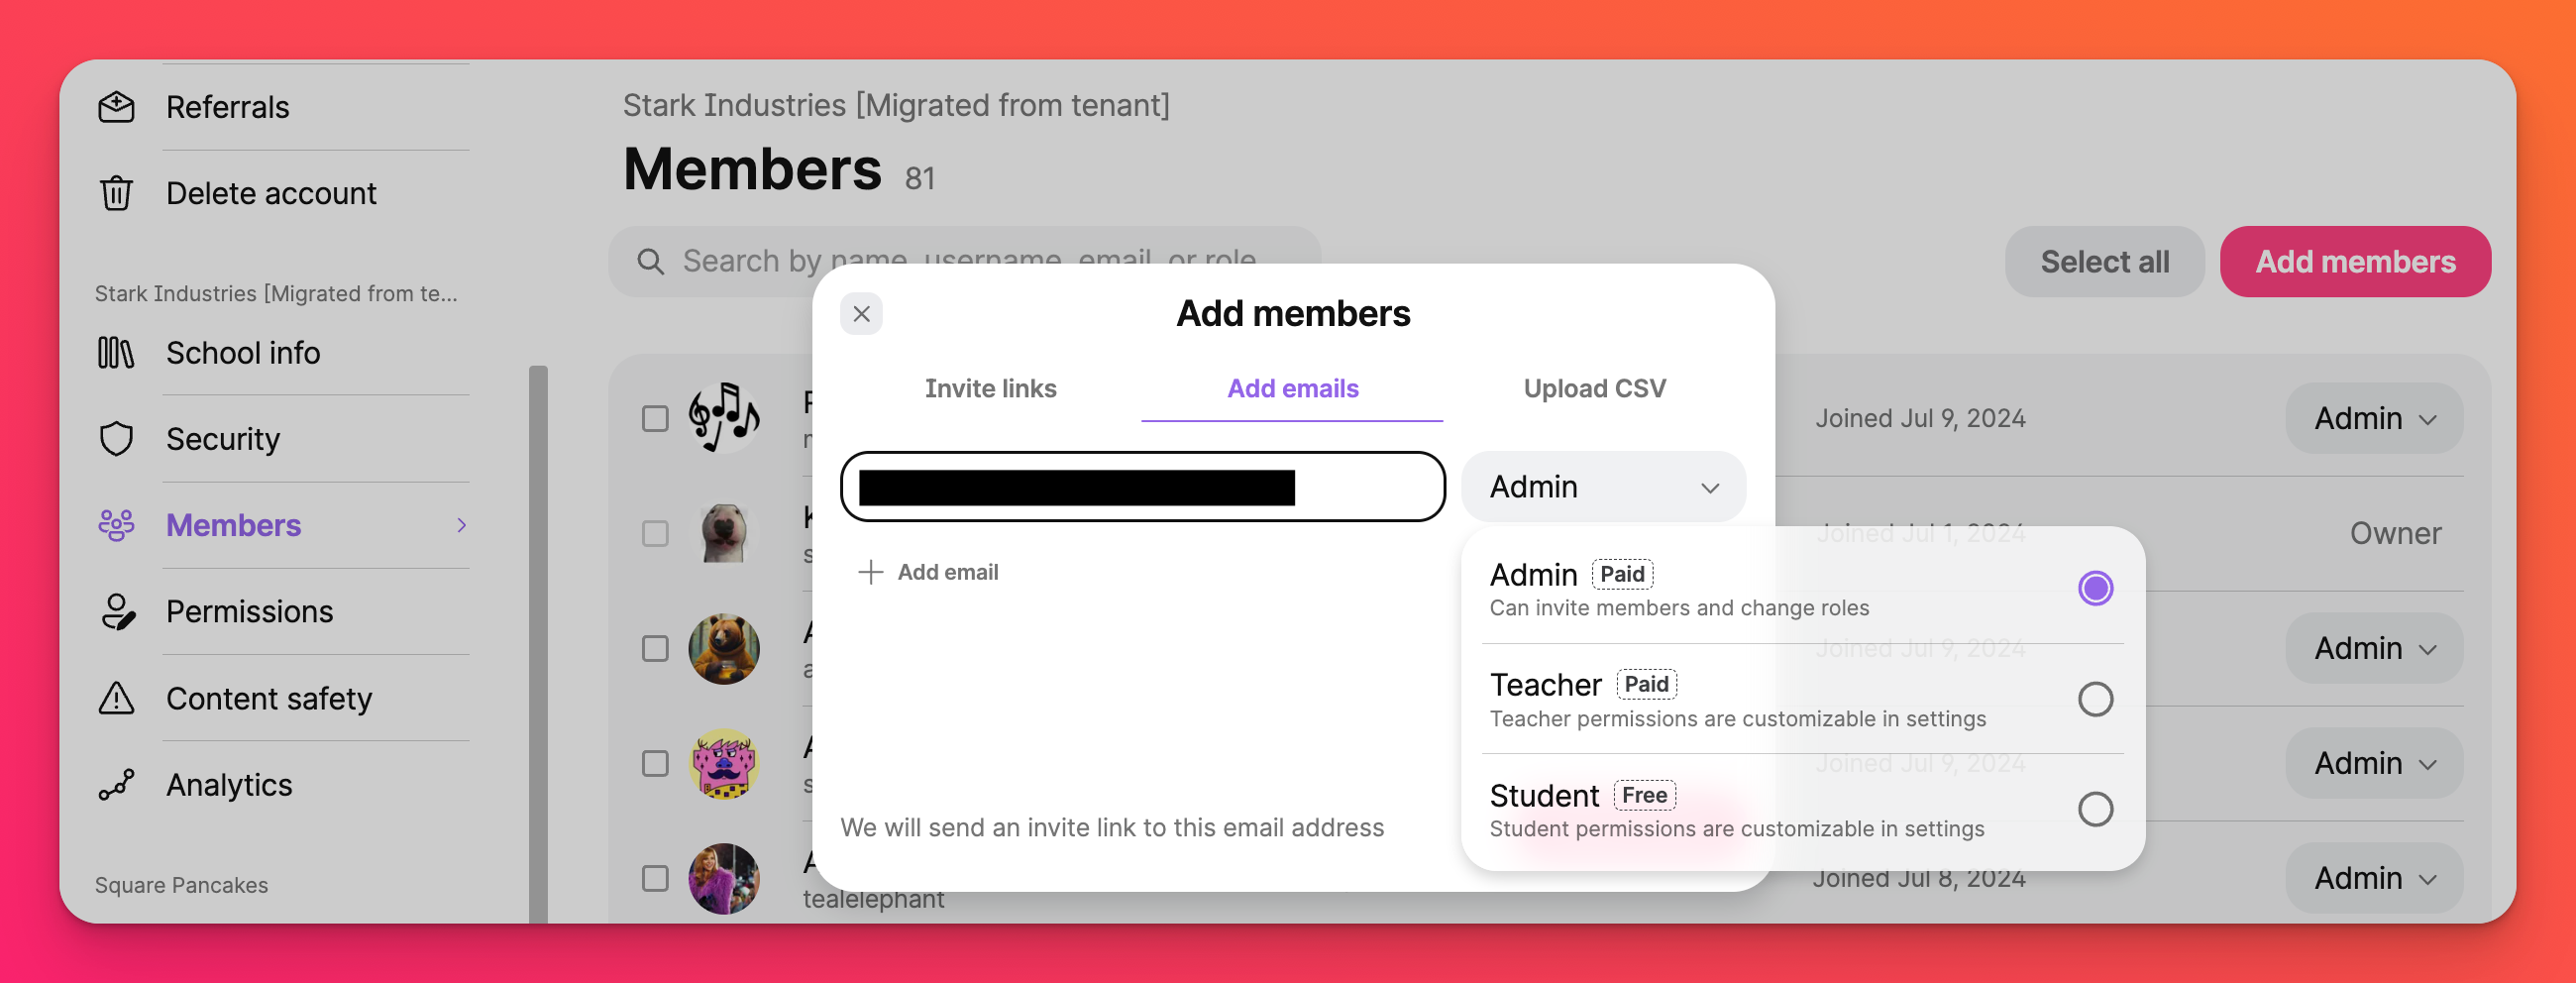
Users with an existing Padlet account will be automatically added to the school's account. Users without an existing Padlet account will be sent an email with a link to sign up. They will be automatically added once they accept their invite.
Add multiple users
Add multiple users with a CSV file.
- Make a copy of this sample csv and add the users' email addresses and a valid role type: Admin, Teacher or Student
- Download as a .csv file
- Open the file with a text editor (such as Notepad or TextEdit) or Microsoft Excel and add rows for all users
- Copy the content
- Click the Settings cog icon at the top of the dashboard > click on the School name at the top > Members
- Click Add members > Upload CSV
- Click Upload to attach your CSV file
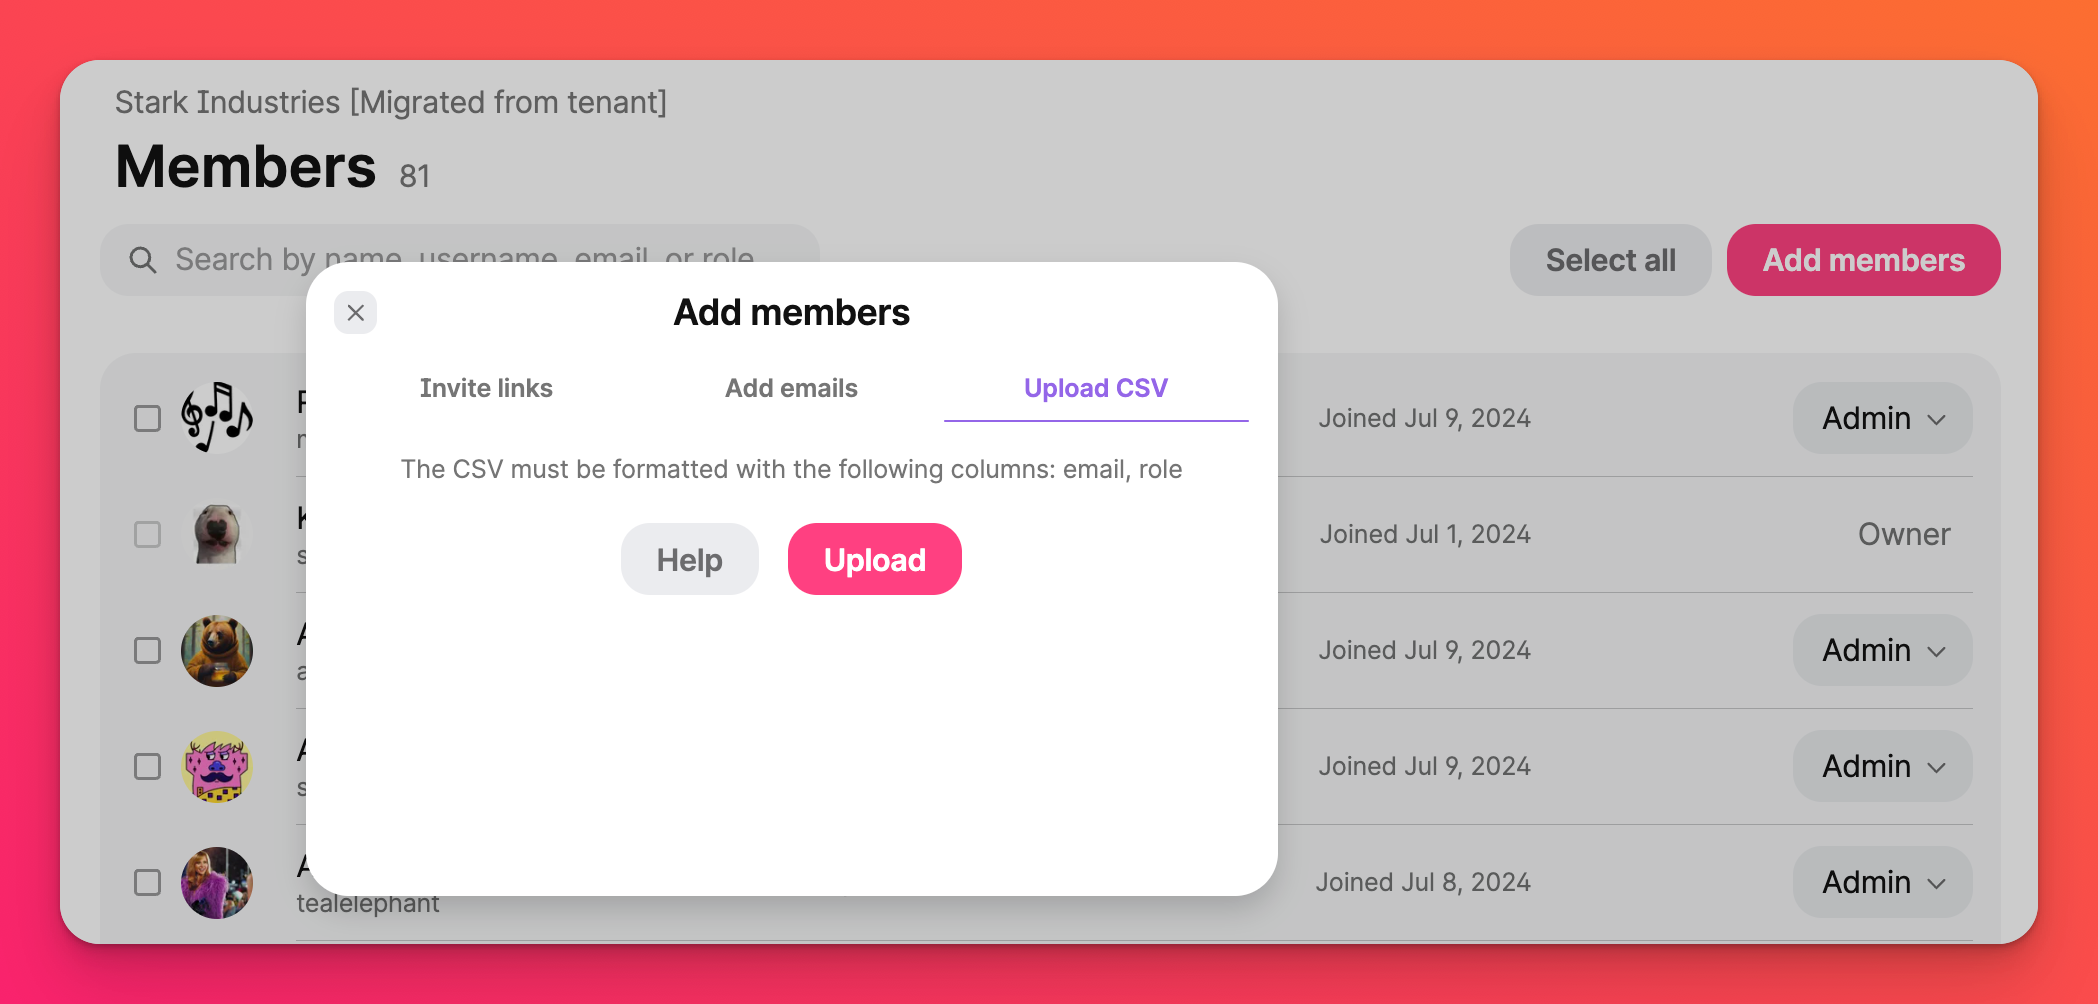
Users with an existing Padlet account will be automatically added to the school's account. Users without an existing Padlet account will be sent an email with a link to sign up. They will be automatically added once they accept their invite.
Domain approval
Account owners can allow self-registration for their organization by getting their domain approved!
Users with emails that match the approved domains will be added to the School account once they log into their organization specific login page (i.e. padlet.com/hogwartsschoolofmagic) or view a padlet from their organization.
To get your domain approved, follow these steps:
- Click on the Settings cog icon at the top of the dashboard
- Click the School name at the top > Access
- Scroll down to the 'Approved domains' section and click Add new domain
- Enter the domain for approval (the part of your email that is after the @ symbol)
- Select the role that these users will be assigned
- Submit your domain
Our team will review the submission and follow up with an email to let you know the status of your request.
Edit user information
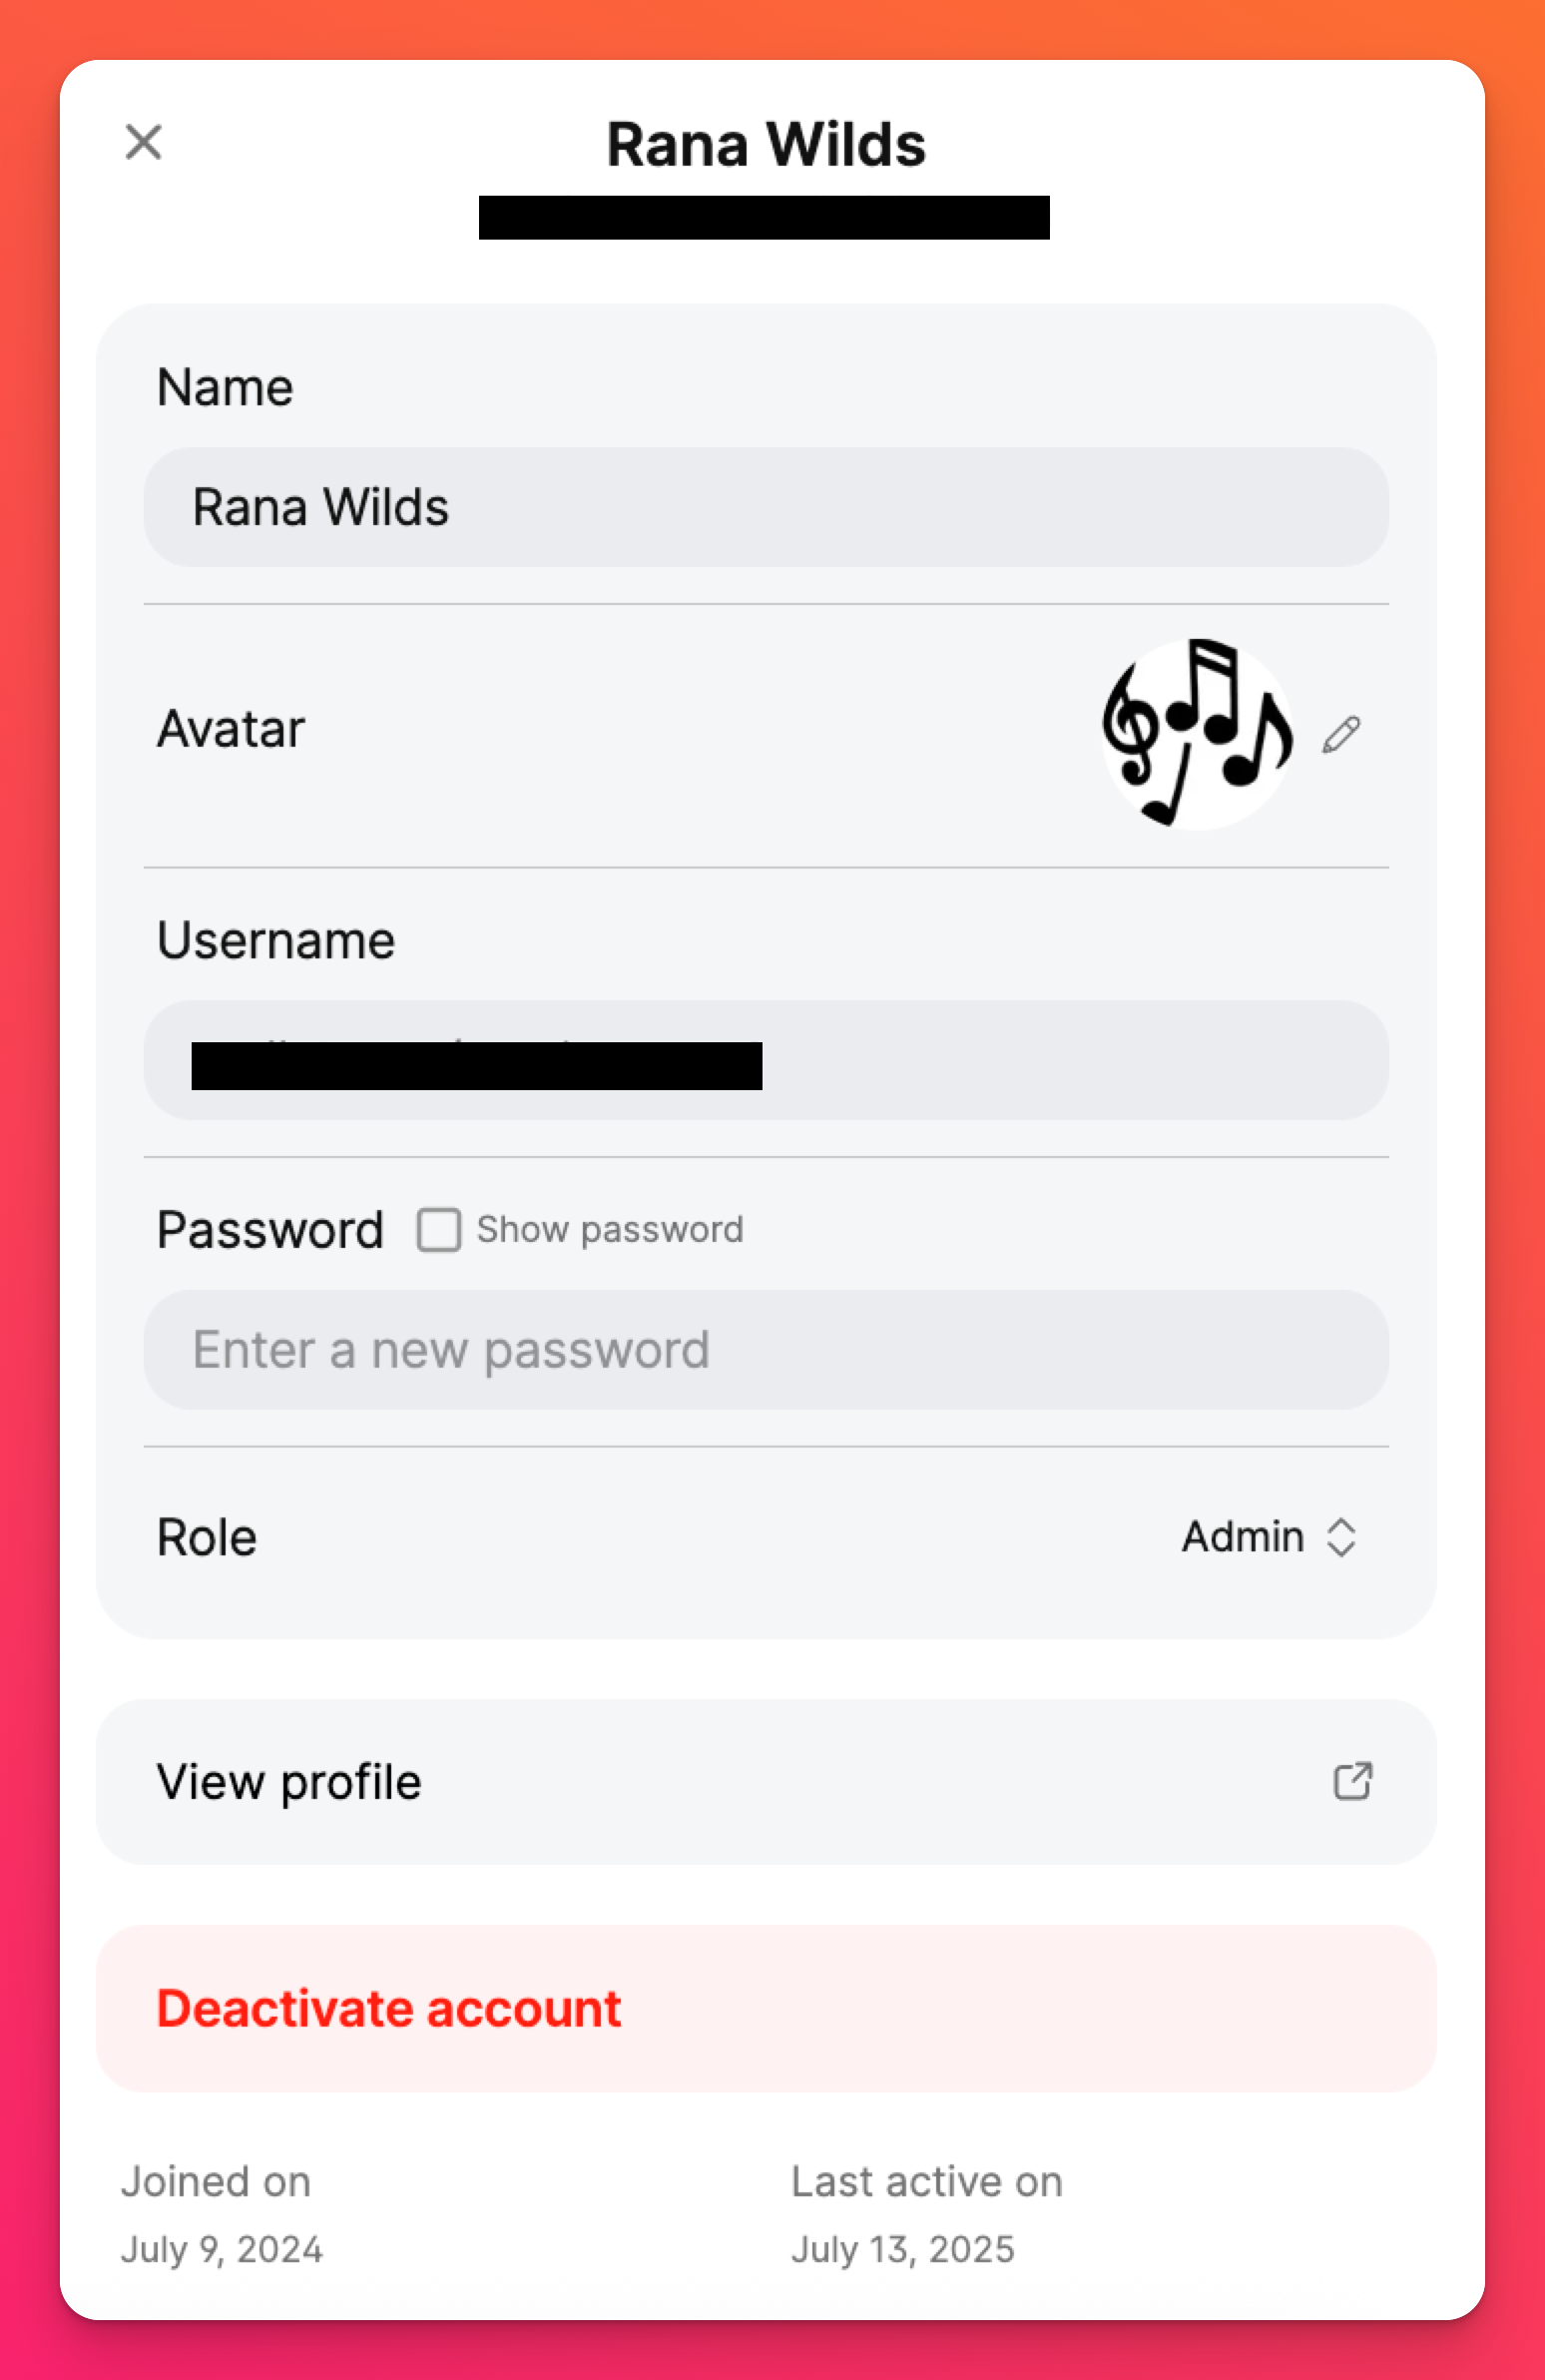
Once a user is added, Owners and Admins can edit members' names, usernames, avatars, passwords and roles within the account.
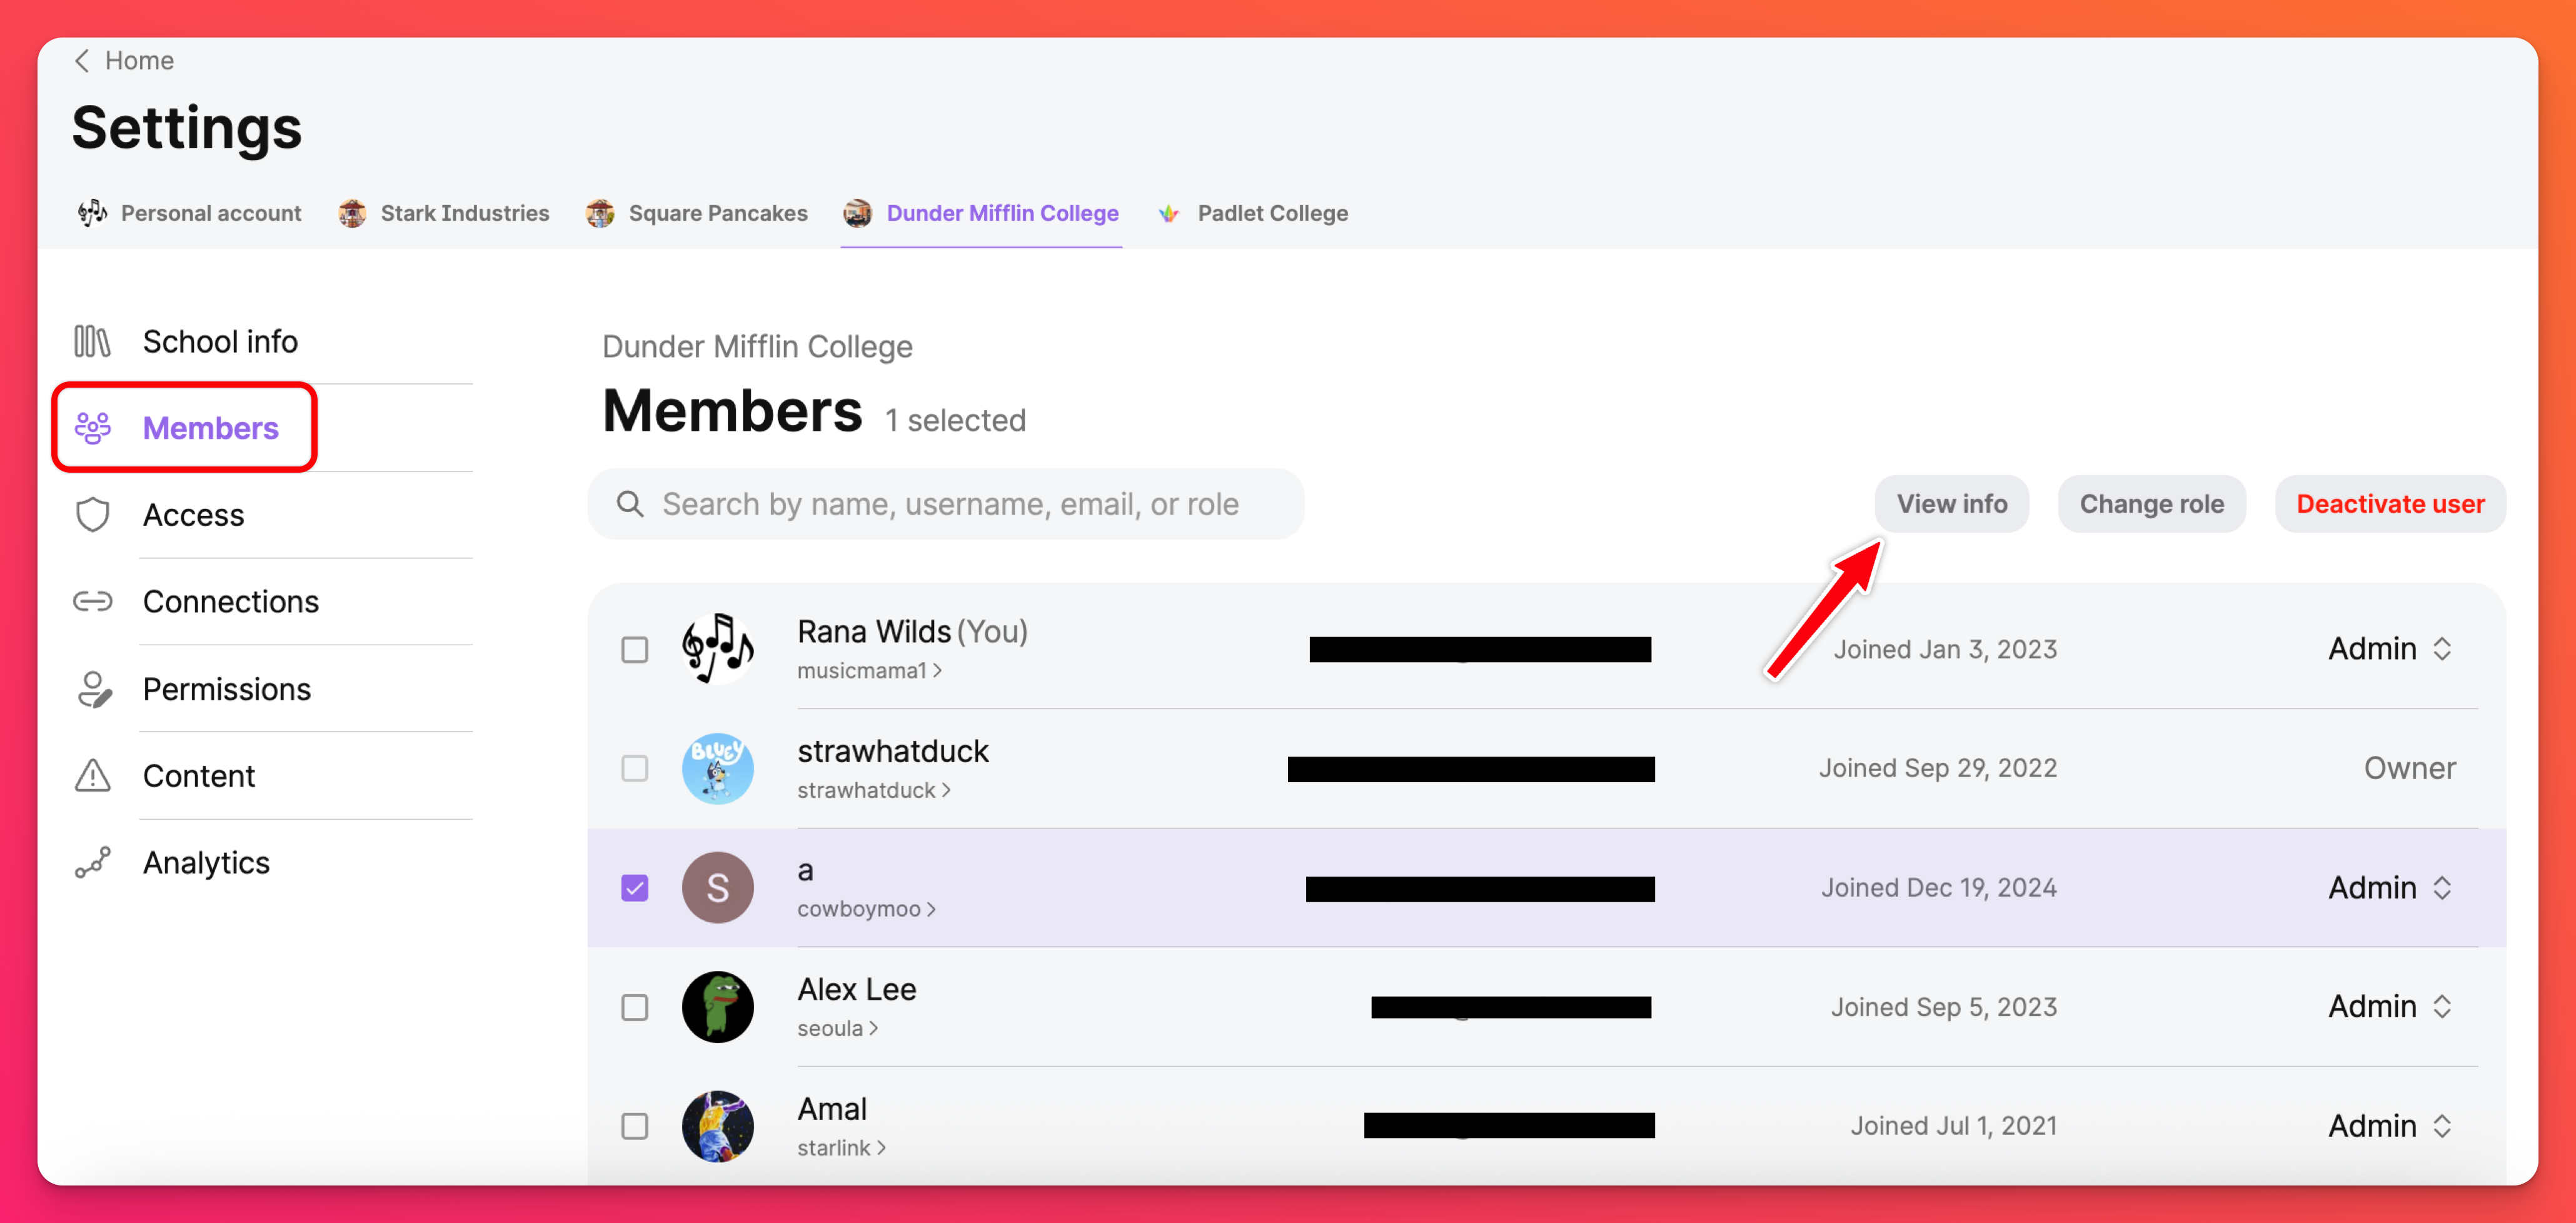
From the Members page, check the box next to the user's name. At the top, click View info at the top of the page.
This will open the User Info panel. View the user's profile page or make your updates, as needed. Don't forget to hit Save!
Edit user roles
Edit a user's role within the account from the Members page.
Edit a single user's role
From the Members page, search or scroll to find the user you want to update. Click on the drop-down menu next to their name and choose the appropriate role type.
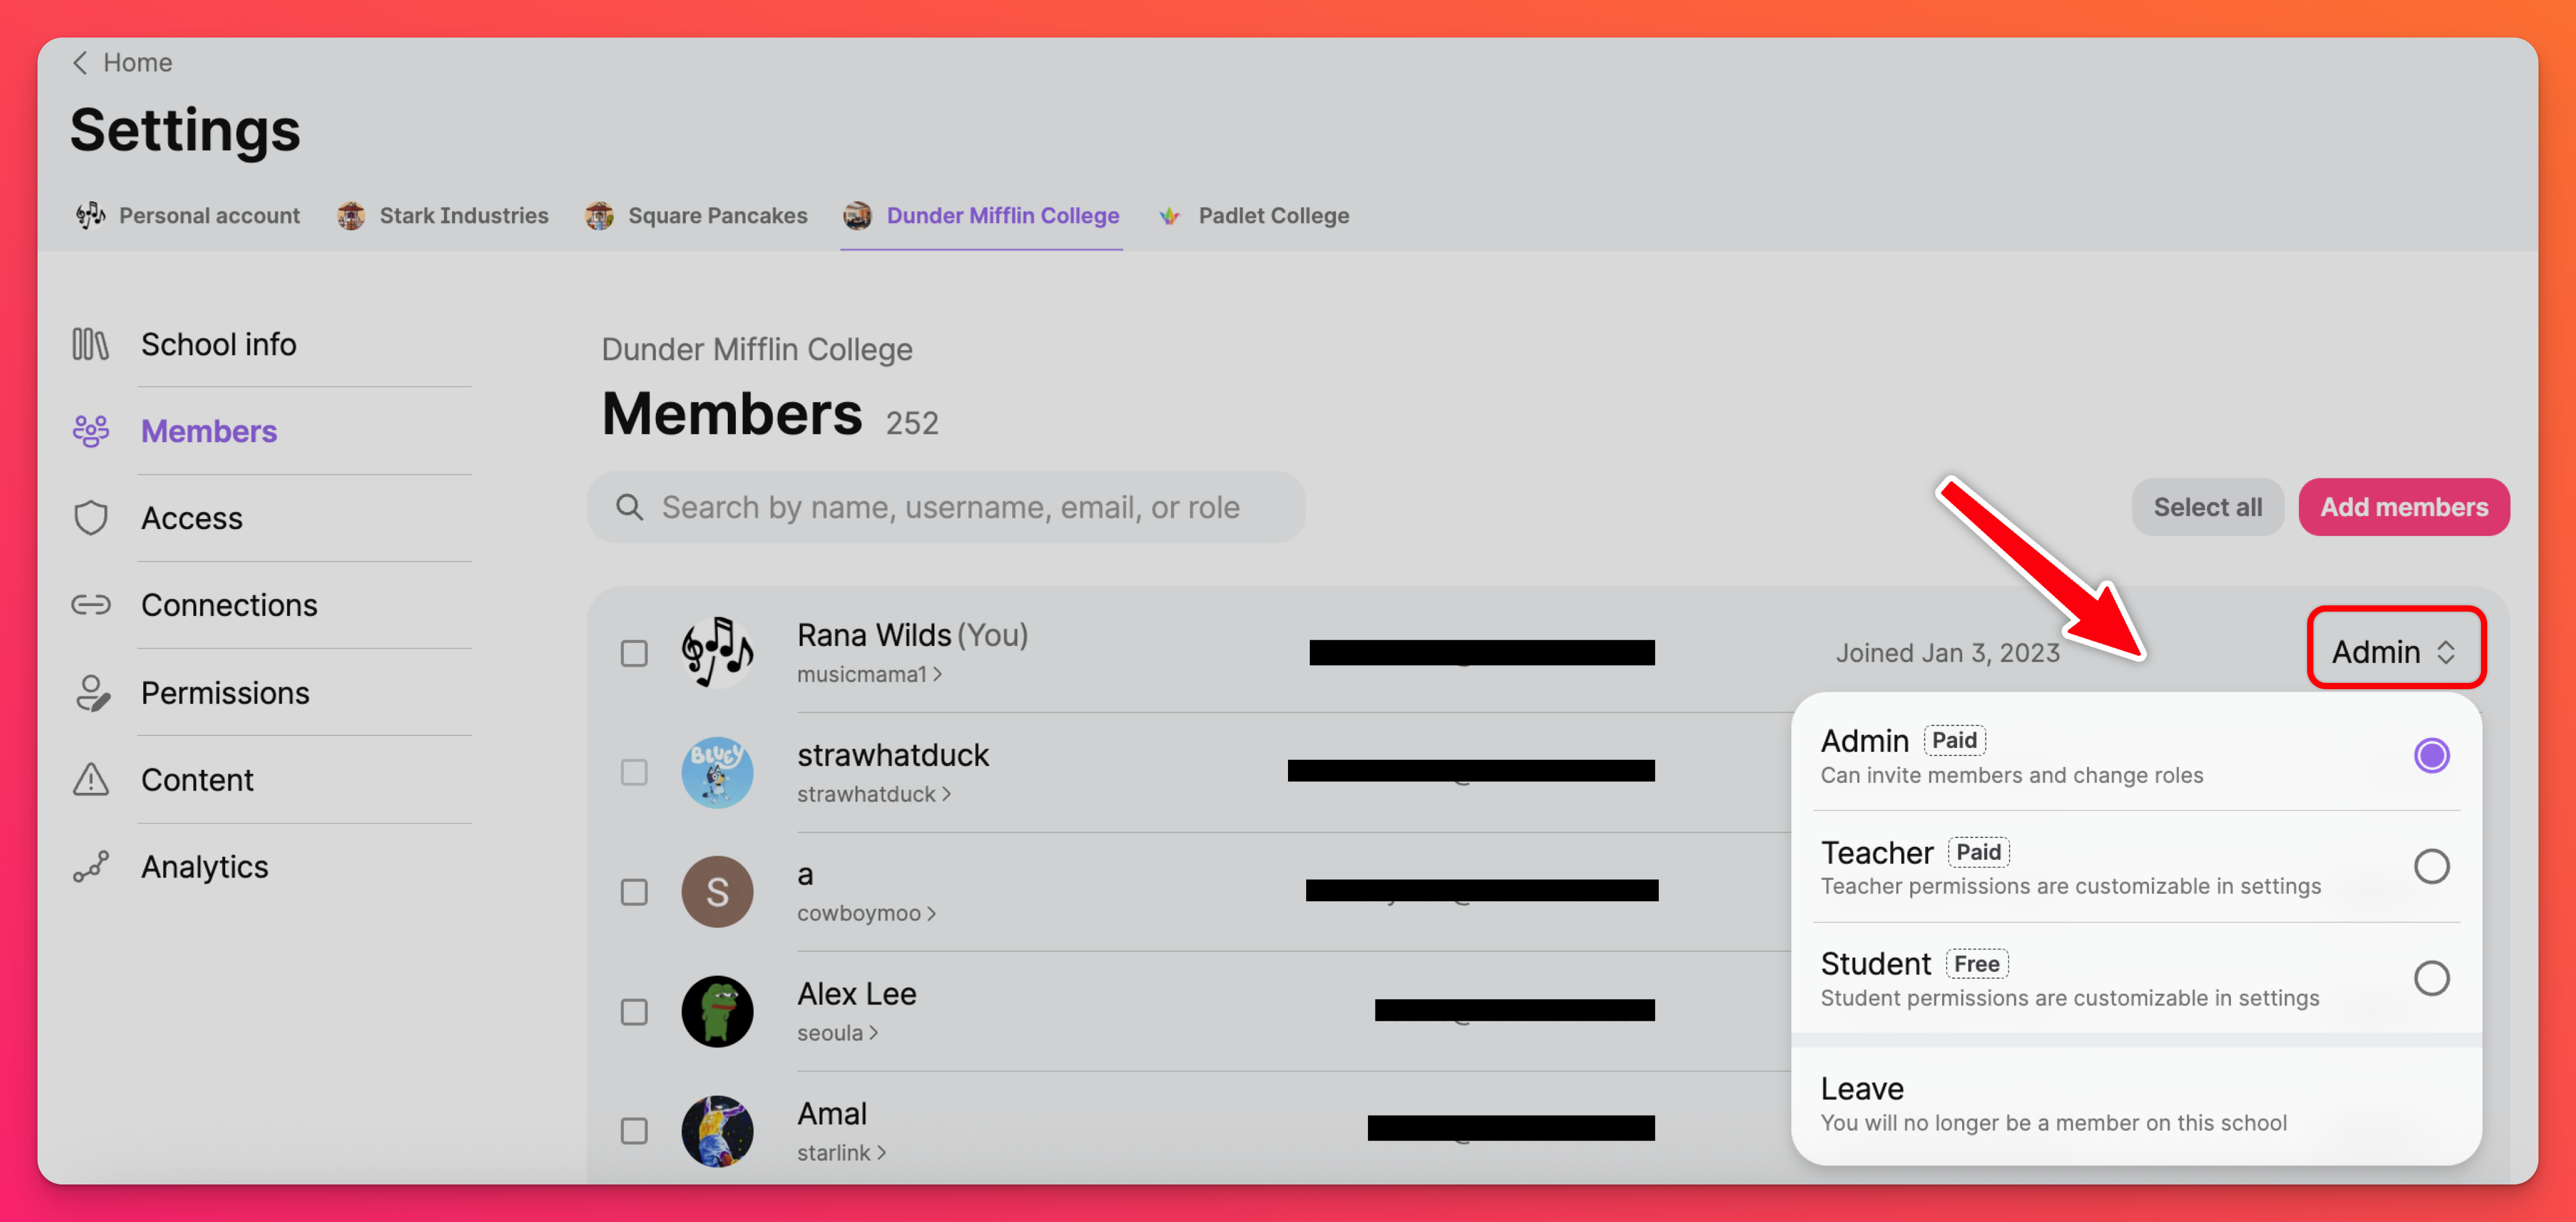
Edit user roles in bulk
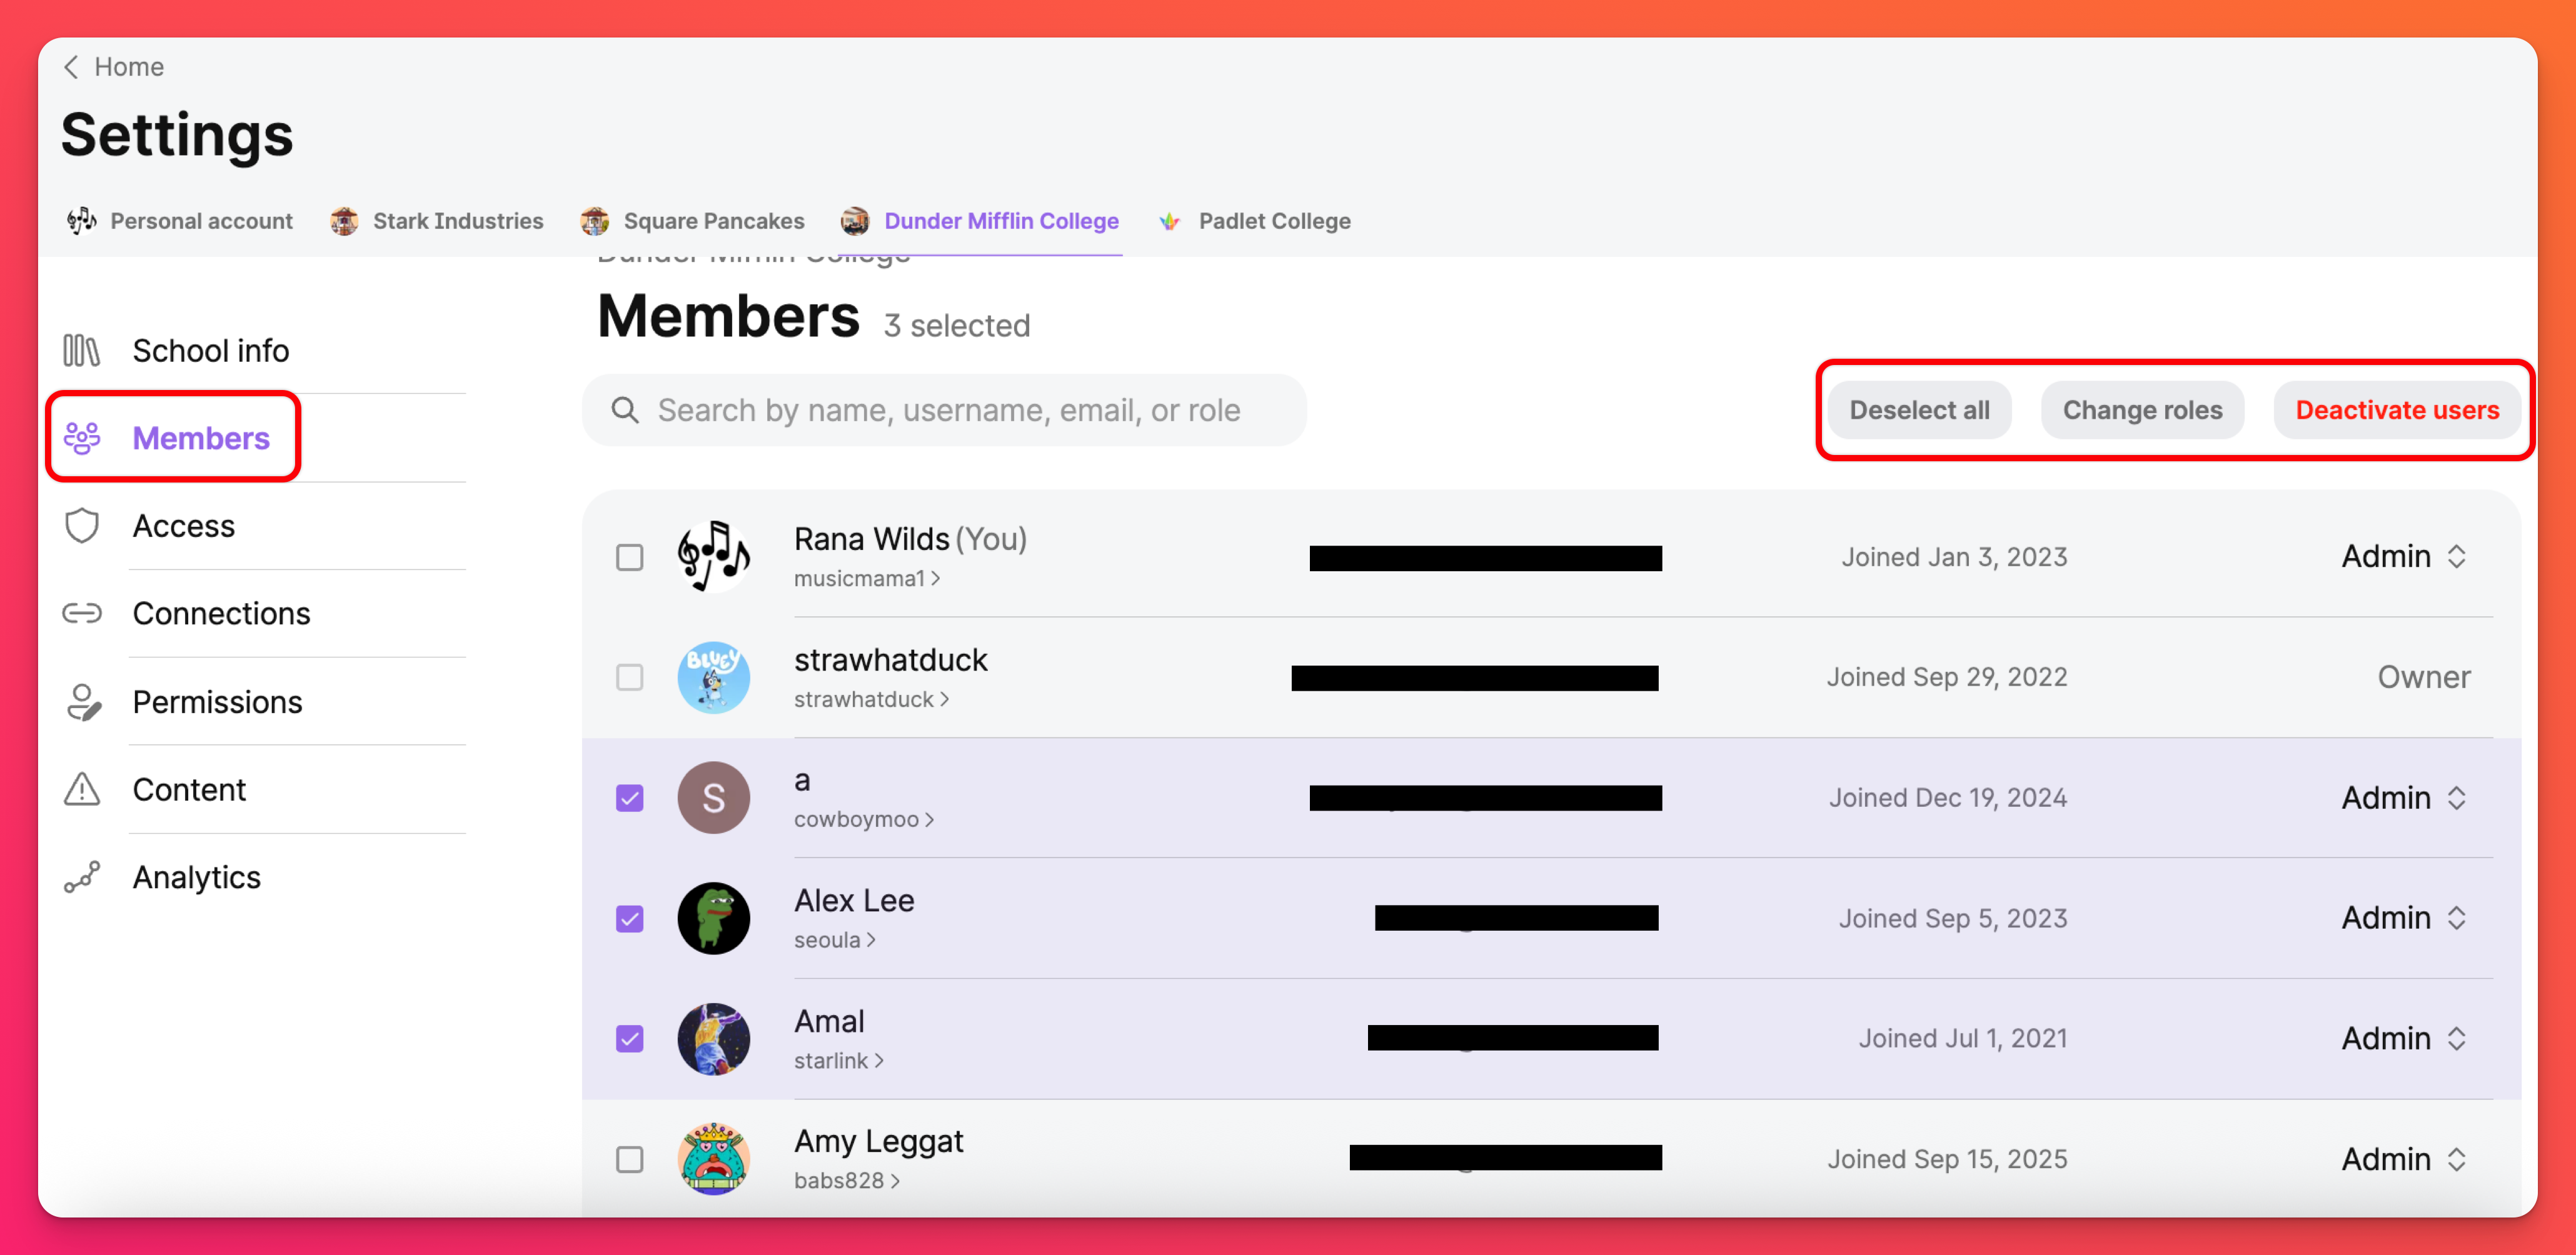
From the Members page, modify user roles in bulk by checking the boxes next to each user you want to edit. Then, select Change roles (at the top).
Deactivate users
When a student or teacher leaves, the account owner may deactivate their user accounts. The user will no longer have access to the school account but can be reactivated, if needed. All padlets associated with a deactivated user are still viewable by members of the school.
Deactivate a single user
From the Members page, search or scroll to find the user you want to Deactivate. Click on the drop-down menu next to their name and choose Deactivate from the menu.
Deactivate users in bulk
To deactivate users in bulk, from the Members page, search for the users by entering the email addresses or usernames (followed by a space or comma) and check the box next to each user. Then, select Deactivate users.
Search users
To search for users within the Members page - Use the search box at the top of the page. After entering their name, username, email address or role, the page will update in real time with your results.

FAQs
Why can't I sort my members list alphabetically?
Read more about the Analytics page here!
When a user is invited to a Padlet for Schools account (at padlet.com) and they have an existing account, will it create a new one?
How do I add users without email addresses to the account?
How do I cancel a pending invitation?
The user I've invited isn’t receiving the invitation — how do I trigger the invitation email again?
Go to the Members page (Settings > school workspace [at the top] > Members)
Find the user with the 'Invite pending' status
Click Resend invite

